OpenCV Selective Search
OpenCV Selective Search for Object Detection


- 1. Selective Search for Objection Recognition (2012)
- 2. Algorithm steps
- 3. Region proposal algorithm needs
- References
import tensorflow as tf
import numpy as np
import argparse
import cv2
print(tf.__version__)
print(cv2.__version__)
import matplotlib.pyplot as plt
import time
1. Selective Search for Objection Recognition (2012)
-
Replaces sliding window and hierachical pyramids technique. The tenchique does not perfoms classification by itself (at needs a classifier for that)
-
Selective Search is far more computationally efficient than exhaustively computing image pyramids and sliding windows (very slow + additional parameters to be tuned)
-
Image can be over-segmented to automatically identify locations in an image that could contain an object
-
Paved the way for RPN (Region Proposal Network) & R-CNN
2. Algorithm steps
- Accepts an image as input
- Over-segment it by applying a superpixel clustering algorithm
- Merge segments of the superpixels based on five components:
- Color similarity
- Texture similarity
- Size similarity
- Shape similarity
- A final meta-similarity, which is a linear combination of the above similarity measures
3. Region proposal algorithm needs
- Be faster and more efficient than sliding windows and image pyramids
- Accurately detect the regions of an image that could contain an object
- Pass these “candidate proposals” to a downstream classifier to actually label the regions, thus completing the object detection framework
ap = argparse.ArgumentParser()
ap.add_argument("-i", "--image", default =  "images/keras_detection/dlui03.jpg", required = False,
    help="path to the input image")
ap.add_argument("-m", "--method", type=str, default="fast",
    choices=["fast", "quality"],
    help="selective search method")
args = vars(ap.parse_args([]))
image = cv2.imread(args["image"])
image = cv2.cvtColor(image, cv2.COLOR_RGB2BGR)
w = 255
scale = w/(image.shape[1])
h = int(scale * image.shape[0])
image = cv2.resize(image, (w, h))
plt.imshow(image)

# input image
ss = cv2.ximgproc.segmentation.createSelectiveSearchSegmentation()
ss.setBaseImage(image)

# check to see if we are using the *fast* but *less accurate* version
# of selective search
if args["method"] == "fast":
    print("[INFO] using *fast* selective search")
    ss.switchToSelectiveSearchFast()

# otherwise we are using the *slower* but *more accurate* version
else:
    print("[INFO] using *quality* selective search")
    ss.switchToSelectiveSearchQuality()

# run selective search on the input image
start = time.time()
rects = ss.process()
end = time.time()
# show how along selective search took to run along with the total
# number of returned region proposals
print("[INFO] selective search took {:.4f} seconds".format(end - start))
print("[INFO] {} total region proposals".format(len(rects)))
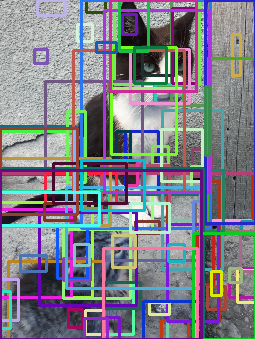
# loop over the region proposals in chunks (so we can better
# visualize them)
for i in range(0, len(rects), 100):
# clone the original image so we can draw on it
output = image.copy()
# loop over the current subset of region proposals
for (x, y, w, h) in rects[i:i + 100]:
# draw the region proposal bounding box on the image
color = [np.random.randint(0, 255) for j in range(0, 3)]
cv2.rectangle(output, (x, y), (x + w, y + h), color, 2)
# show the output image
#cv2.imshow("Output", output)
plt.imshow(output) #cv2.imshow("Output", output)
#key = cv2.waitKey(0) & 0xFF
# if the `q` key was pressed, break from the loop
#if key == ord("q"):
# break
References
References:https://www.pyimagesearch.com/2020/06/29/opencv-selective-search-for-object-detection/